Publish models
QSAR models built using CPSign can be published as web servers that can be interacted with using REST, and which are automatically documented using OpenAPI specifications. The software required for this is located in a separate repository: CPSign predict services which also contain more information. To publish and work with out prebuilt servers you need to use Docker, e.g. by installing Docker desktop on your machine. Here we first go through the basics of how these work and then detail the steps required to publish models at SciLifeLab Serve.
Introduction
The QSAR models, i.e., the ones that predicts directly on chemical compounds are possible to publish as web servers. These servers and models contain all meta information needed for computing descriptors and e.g. perform feature transformations. It is not possible to make non-QSAR models available with these servers at this point. These web servers are possible to build using two different flavors: either thin which only includes the java web server which can be interacted with using REST, or full which also include static files for serving the Swagger UI for inspecting the OpenAPI specification of the REST endpoints and the Draw UI which looks like this:
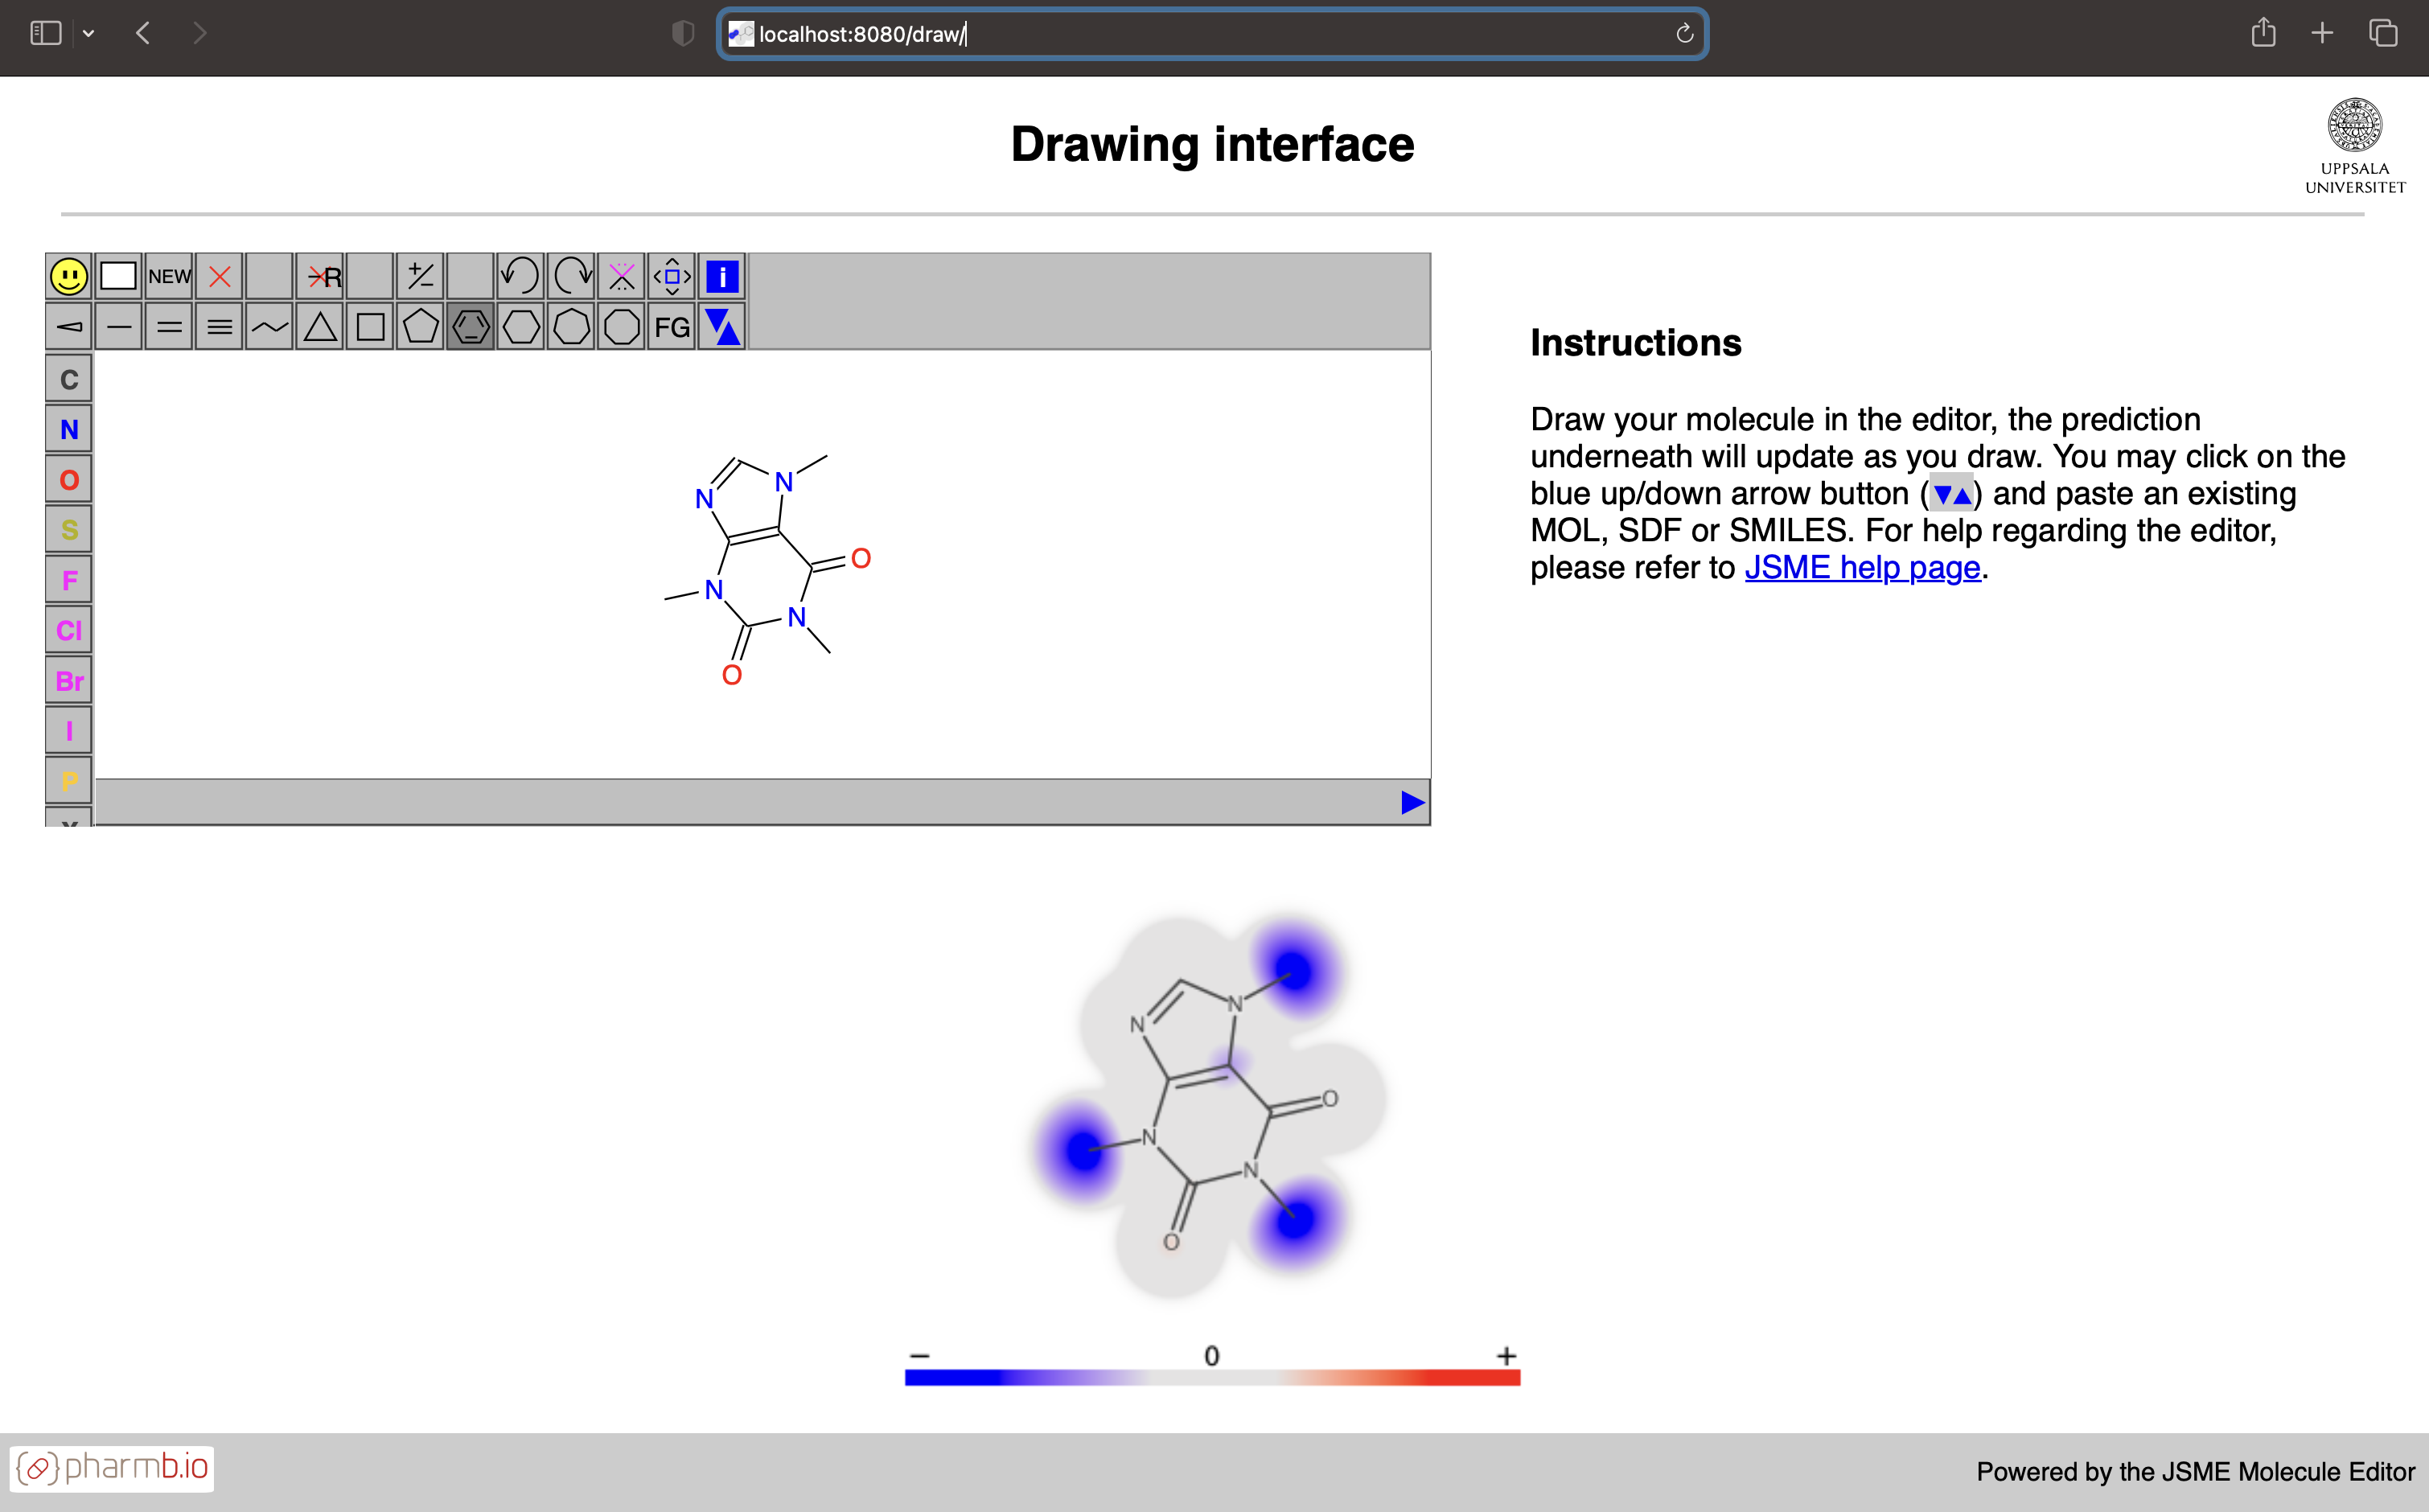
In the Draw UI it is possible to input molecules in common chemical formats as well as draw/edit the molecules interactively - and get the predicted atom contributions rendered below the input window. Due to rapid prediction time this can be used interactively and will update as you edit the molecule.
Deploying a model
Deploying a model is easily achieved using our prebuilt Docker images that can be found at GitHub Container repository: CPSign predict services packages. There is one image for each model type and deploying your own model and can easily be achieved by e.g. extending the image by simply copying the model you wish to deploy;
# Pick the base image to use
FROM ghcr.io/arosbio/[IMAGE-NAME]:[TAG]
# Copy your model to the default model-path
COPY [MODEL-FILE] /var/lib/jetty/model.jar
If you build this into a Docker image you can then send it around, packaged with the model you wish to deploy. Building it and running it is as simple as (assuming you’re in the same directory as the Dockerfile as well as the model you wish to deploy):
docker build -t [YOUR TAG] .
Then you can run it using:
docker run -p 80:8080 -u jetty [YOUR TAG]
The web server is by default listening on port 8080 and in the above line we forward port 80 to 8080 so you can interact with it using your web browser without specifying a custom port. E.g. to check that it is running enter localhost/api/v2/health or localhost/api/v2/modelInfo in your browser.
Alternative ways to deploy using prebuilt images
Alternative ways to deploy a model can be to mount a volume into the container when starting it up and give the URI of the model as an environment variable. The environment variable MODEL_FILE can be set to use a custom location specifying where to read the model from. This URI can either be a local URI or a remote one that can be accessed from the container. A small example assuming that you have a conformal classification model in the current directory called clf-model.jar you can start up a server using:
docker run -p 80:8080 \
    --name clf-model \
    --mount type=bind,source="$(pwd)",target=/app/data \
    --env MODEL_FILE=/app/data/clf-model.jar \
    ghcr.io/arosbio/cpsign-cp-clf-server:latest
In this example you mount your current directory (source="$(pwd)") to the directory /app/data/ inside the container - your clf-model.jar is thus located in /app/data/clf-model.jar - which we specify to MODEL_URI using the --env parameter.
Add a custom information page
The OpenAPI definition is fixed when using these deployments and the only information about your model is information from the modelInfo endpoint. This however only includes the model name and the version specified when generating the model using CPSign. In order to include more details about your model inside the server we here give an example of how this can be achieved using the python package Conformal-eval, although the same procedure can be used to package any custom information in your web server.
1. Install conformal-eval and generate a model report
Conformal-eval requires python of at least 3.8 and can be installed using;
pip install conformal-eval[report]
# or, if using e.g. zsh shell you might need
pip install "conformal-eval[report]"
Apart from the python package that computes metrics and generates performance figures this also installs a CLI program cpsign-report that can be used to generate a simple report in html format. To see the available parameters run the following;
> cpsign-report -h
usage: cpsign-report [-h] -mf MODEL_FILE [-vf VALIDATION_FILE] [-of OUTPUT_FILE] [-if INFO_FILE]

Generate a Model report for a CPSign model. Optionally include a `validation file` generated by `cpsign validate` or `cpsign crossvalidate` that include performance data for the model. Note that the html
report both create an HTML page and a sub-directory `static` with e.g. generated SVG figures to include in the HTML and other files.

optional arguments:
  -h, --help            show this help message and exit
  -mf MODEL_FILE, --model-file MODEL_FILE
                        Path to the model file
  -vf VALIDATION_FILE, --validation-file VALIDATION_FILE
                        Path to the optional validation file
  -of OUTPUT_FILE, --output-file OUTPUT_FILE
                        Path to where to save the generated HTML page and static files. This should either be a file ending with `.html` (e.g. model-report.html) or a directory name.
  -if INFO_FILE, --info-file INFO_FILE
                        Path to a file with extra information about the model, can include html-tags for better formatting
So the basic input is the -mf/--model-file which should point to a valid CPSign model. The (optional) -vf/--validation-file should point to a CSV file with overall statistics (corresponding to the --result-output output from CPSigns validate or crossvalidate programs). The -of/--output-file is where the output should be saved.
Once you have run cpsign-report and generated the report, and e.g. specified --output-file <some-path>/html the generated html directory should have the following content:
html
 ├── model-report.html
 └── _static
        ...
     └── style.css
The html page can be named differently depending on your argument to --output-file and the actual content and name of the _static directory might differ depending on e.g. if you have given a validation file or not. If you have given a validation file there should be e.g. a calibration_fig.svg file if you gave a conformal model.
NOTE: this model report generation is currently in beta version and should only serve as creating a starting template, you can then manually alter the html with further details that are suitable to your needs.
2. Building your Docker image
To include your model report in the web server you have to alter the Dockerfile to update the ROOT.war file inside the predict-service, here you must move your html directory into the same directory as your Dockerfile and model-file so that it is included in the docker build context. Now you need to add a few extra things to your Dockerfile, here is an example for a conformal regression model:
FROM ghcr.io/arosbio/cpsign-cp-reg-server:latest-full

# Copy the model to the default location
COPY test-model.jar /var/lib/jetty/model.jar

# Switch to root to install packages
USER root
# Specify a temporary directory
ARG TMP_DIR=/my_tmp

# install the zip program and create the TMP_DIR
RUN apt-get update; \
    apt-get install -y zip; \
    rm -rf /var/lib/apt/lists/*; \
    mkdir -p $TMP_DIR

# Copy the model report contents into the container
COPY html $TMP_DIR

# Add model report contents to the ROOT.war and clean up
RUN cd $TMP_DIR; \
    zip -ur /var/lib/jetty/webapps/ROOT.war .; \
    cd -; \
    rm -rf $TMP_DIR

# Reset to correct user
USER jetty
Building your image is then as straightforward as usual. You may have to tweak things depending on your specific needs. Once you have deployed your model you should be able to access the model report at <server-ul>[:optional-port]/model-report.html (assuming your html page is called model-report.html).
Publish models at SciLifeLab Serve
This sections is a how-to-guide for how to publish models using the SciLifeLab Serve facility, mainly intended for researchers to e.g. publish models in connection with a published manuscript. To publish services at SciLifeLab you need to publish public Docker images at an online container repository, this guide details how this is done using the GitHub docker registry. To follow this guide you need to have a public GitHub repository that your models and images can be connected to, this can either be a personal repository or one linked to an organization (e.g. https://github.com/pharmbio). Note: if you either wish to build your Docker image locally or if you wish to test it out locally you need to have Docker desktop installed.
1. Build your Docker image
Building and publishing the Docker image can be achieved in two main ways; (1) building using GitHub actions (builds remotely), or (2) building locally and pushing the images to GitHub. The first way is easier but it requires the model file to be small enough that it can be saved within GitHub. For larger models that cannot be tracked with git, or in case you do not wish to save it within the repository, you should use option (2).
1.1 Set up the Docker build
To publish your models at Serve they have two hard requirements;
The container must run as user
1000The container must have a start-up script called
start-script.shthat should be used as entrypoint
Unfortunately these requirements forces the Docker build to be a bit more complex as the default user from the jetty base images is user "jetty" with id 999. To comply with the requirements posed by Serve follow these steps:
Create a new directory in your repository that will serve as build directory for the Docker image.
Place your model that you want to deploy in the build directory.
Download and place the Dockerfile in your build directory. You need to replace all values inside square brackets, the ones starting with
[OPTIONALcan be removed. Note: the[SERVER-TYPE]must match with your model type, see available types at CPSign predict services. In case you want to serve the Swagger UI and Draw UI as part of your service, specify a tag with a-fullsuffix. For an example of a complete Dockerfile look at our example project cpLogD-v2.0 Dockerfile. Note: the lineLABEL org.opencontainers.image.source=[URL TO YOUR GITHUB REPO]is required for GitHub to be able to link the images to your specific repository.Download the start-script.sh and place it in your build directory (you do not have to make any updates to it).
Now it is time to build the image, either follow build remotely or build locally.
1.2 Build image remotely on GitHub
Note: Your model file must be smaller than GitHub file size limits (giving warnings for files larger than 50MB and blocks files larger than 100MB).
To build your docker image remotely you create a github action by adding a yaml file in the directory .github/workflows (from the repository root), you can download and use the publish-docker-image.yaml file as a starting point and update the values marked with [TODO: ]. This workflow will be triggered automatically for a push event in branches main and master or you can manually trigger it in GitHub. Especially note the environment variables that you set on lines 22 and 23, which should be the relative path to the Dockerfile from the repository root and the build directory which you created above. E.g. if your build directory is called build_dir and you used the standard Dockerfile name for your dockerfile these would be DOCKER_FILE: build_dir/Dockerfile and working-directory: build_dir.
Once you have pushed the workflow file and the contents of your build directory from the previous step your docker image will be built on GitHub servers and you should find it under the Packages in your GitHub repository web page. To verify that it is working as it should, run the following (replace ghcr.io/org/repo:latest with the correct tag for your image):
docker pull ghcr.io/org/repo:latest
docker run -p 80:8080 --name test-server ghcr.io/org/repo:latest
This should now start up your model in your local computer and you can verify that it is working by e.g. going to localhost/api/v2/modelInfo in your web browser to see that it returns a JSON with modelName and version information. If this worked you are now ready to move over to the next step to make it public.
1.2 Build image locally
Here you do not have to push the contents of your docker build directory to GitHub. This step requires that you have Docker desktop installed as well as the Buildx extension (that may come with the Docker desktop installation, depending on your installation). With Buildx you can cross-compile docker images for several platforms and architectures, so more users can utilize your docker image.
Follow these steps:
Create a security token for GitHub. To push the built images you need to authenticate yourself to GitHub in your terminal session. To do this you have to create an authentication token. At this point only
Personal access token (classic)is supported for interaction with the Docker repository, follow these steps to create such a token.Authenticate to GitHub. Here you use your token in order to authenticate to GitHub in your current terminal session, this can be done using e.g.:
# Save token in CR_TOKEN
export CR_TOKEN=[your token]
# Login
echo $CR_TOKEN | docker login ghcr.io -u [USERNAME] --password-stdin
> Login Succeeded
Note that these are subject to change, so for more information read the current documentation at GitHub documentation (or other relevant information in case their recommended workflow changes).
Create a Buildx builder instance. This is needed for the subsequent docker build.
docker buildx create --name mybuilder --use
# optionally print stats about the builders
docker buildx inspect --bootstrap
Build the image. Build the image using
docker buildx buildfrom your build directory in your terminal. Use the--platformargument to specify which architectures to build for. SciLifeLab Serve are running their services on a linuxx86_64architecture, meaning we at least have to specifylinux/amd64but to test it on e.g. a Mac Apple Silicon chip you can use thelinux/arm64platform. Update the following by replacing the[USER | ORGANIZATION]and[REPOSITORY]so it matches your repository. Add an appropriate[TAG]for the image, or uselatest.docker buildx build \ --platform linux/amd64,linux/arm64 \ -t ghcr.io/[USER | ORGANIZATION]/[REPOSITORY]:[TAG] \ . --push
For example, for our example service cpLogD-v2.0 the repository is called
cplogd-v2.0and the organization it belongs to is calledpharmbioso the tag should thus beghcr.io/pharmbio/cplogd-v2.0:latest.This call will automatically push the built image(s) to your repository due to the last
--pushflag. Now you should be able to view the generated image underPackagesin your GitHub repository web page. To verify that it is working as it should, run the following (replaceghcr.io/org/repo:latestwith the correct tag for your image):docker pull ghcr.io/org/repo:latest docker run -p 80:8080 --name test-server ghcr.io/org/repo:latest
This should now start up your model in your local computer and you can verify that it is working by e.g. going to
localhost/api/v2/modelInfoin your web browser to see that it returns a JSON with modelName and version information. If this worked you can now move on to the next step.
1.3 Make your image public
At this point you should have a docker image packaged with your model and available through GitHub container repository. To publish it at Serve you have to make sure that its visibility is set to public (so anyone can pull it from GitHub). By default the image will be private (red square):
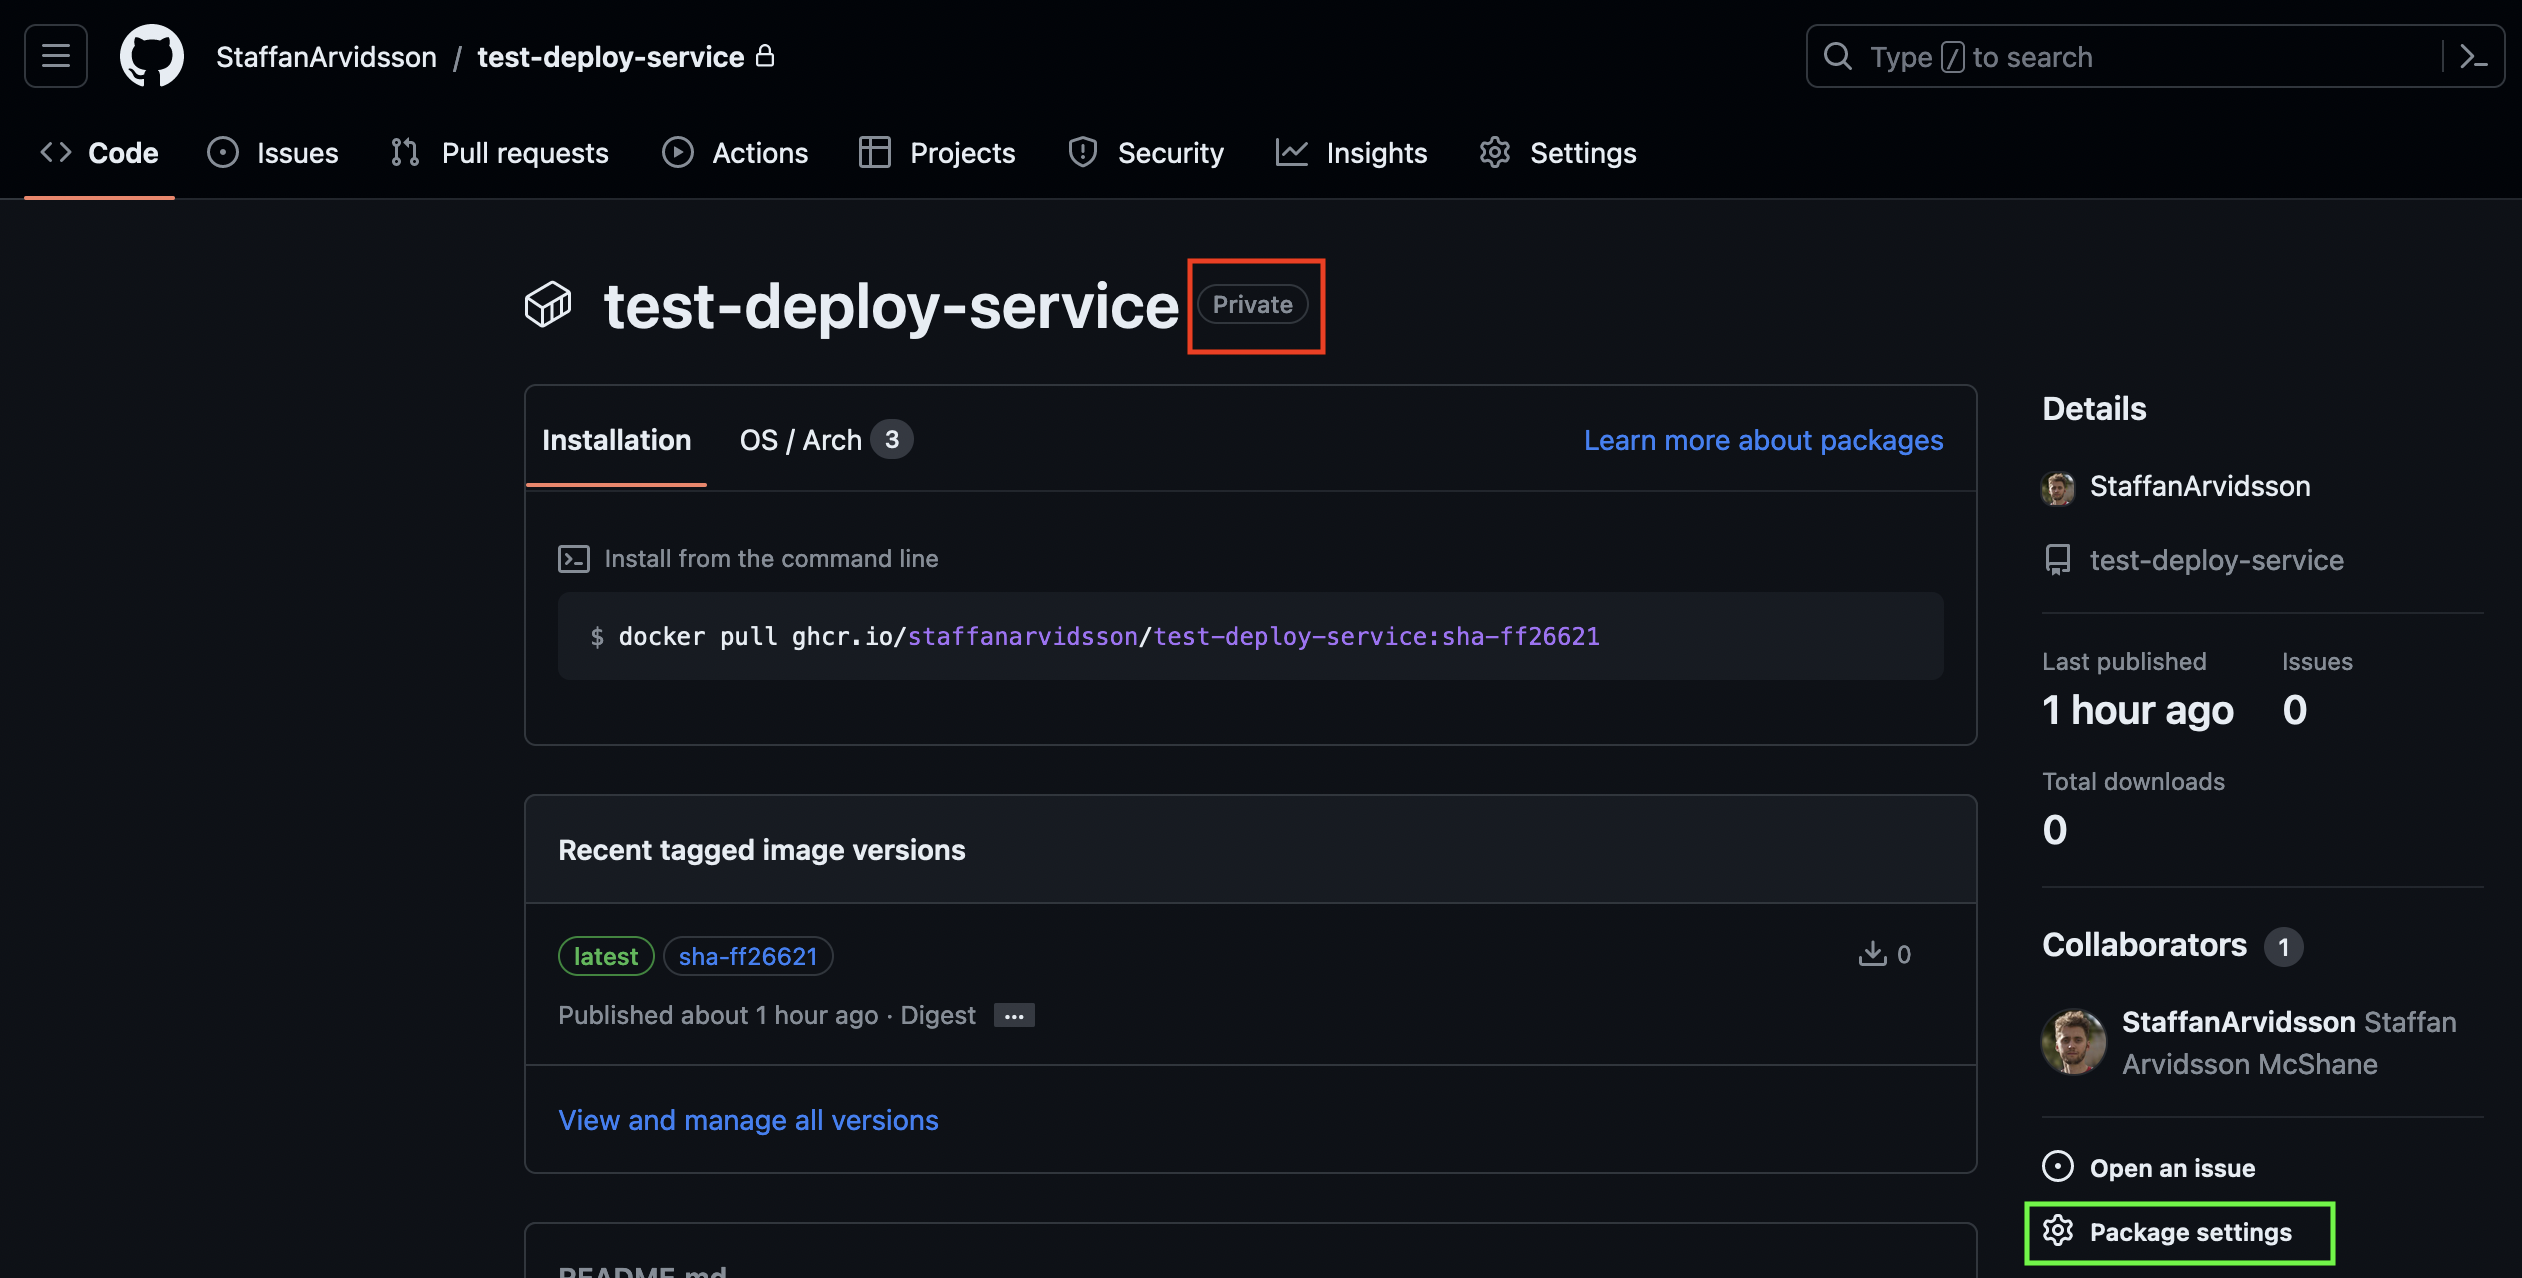
To change visibility go to Package settings (neon green square) in the lower right in the image. Scroll down to the Danger Zone and press Change visibility and pick Public. If your repository is part of an organization or if you do not have sufficient privileges you may not be allowed to change it to public, in which case you have to get help to make this change for you. Going back to package page (image above) the Private text next to the image name should be gone.
2 Deploy service at SciLifeLab Serve
Now you should have a publicly available docker image that is ready to publish. Here we detail how to do so in SciLifeLab Serve.
Create an account at Serve. You need to create an account at SciLifeLab Serve following their guide. This is free of charge for life science researchers affiliated with Swedish research institutions.
Create a Serve project. Login to your account and create a new by pressing
+ New project-> pickDefault project. Give it a name and a description.Create an App. In your project you should now create a
Custom Appunder theServesection (highlighted section in the image below).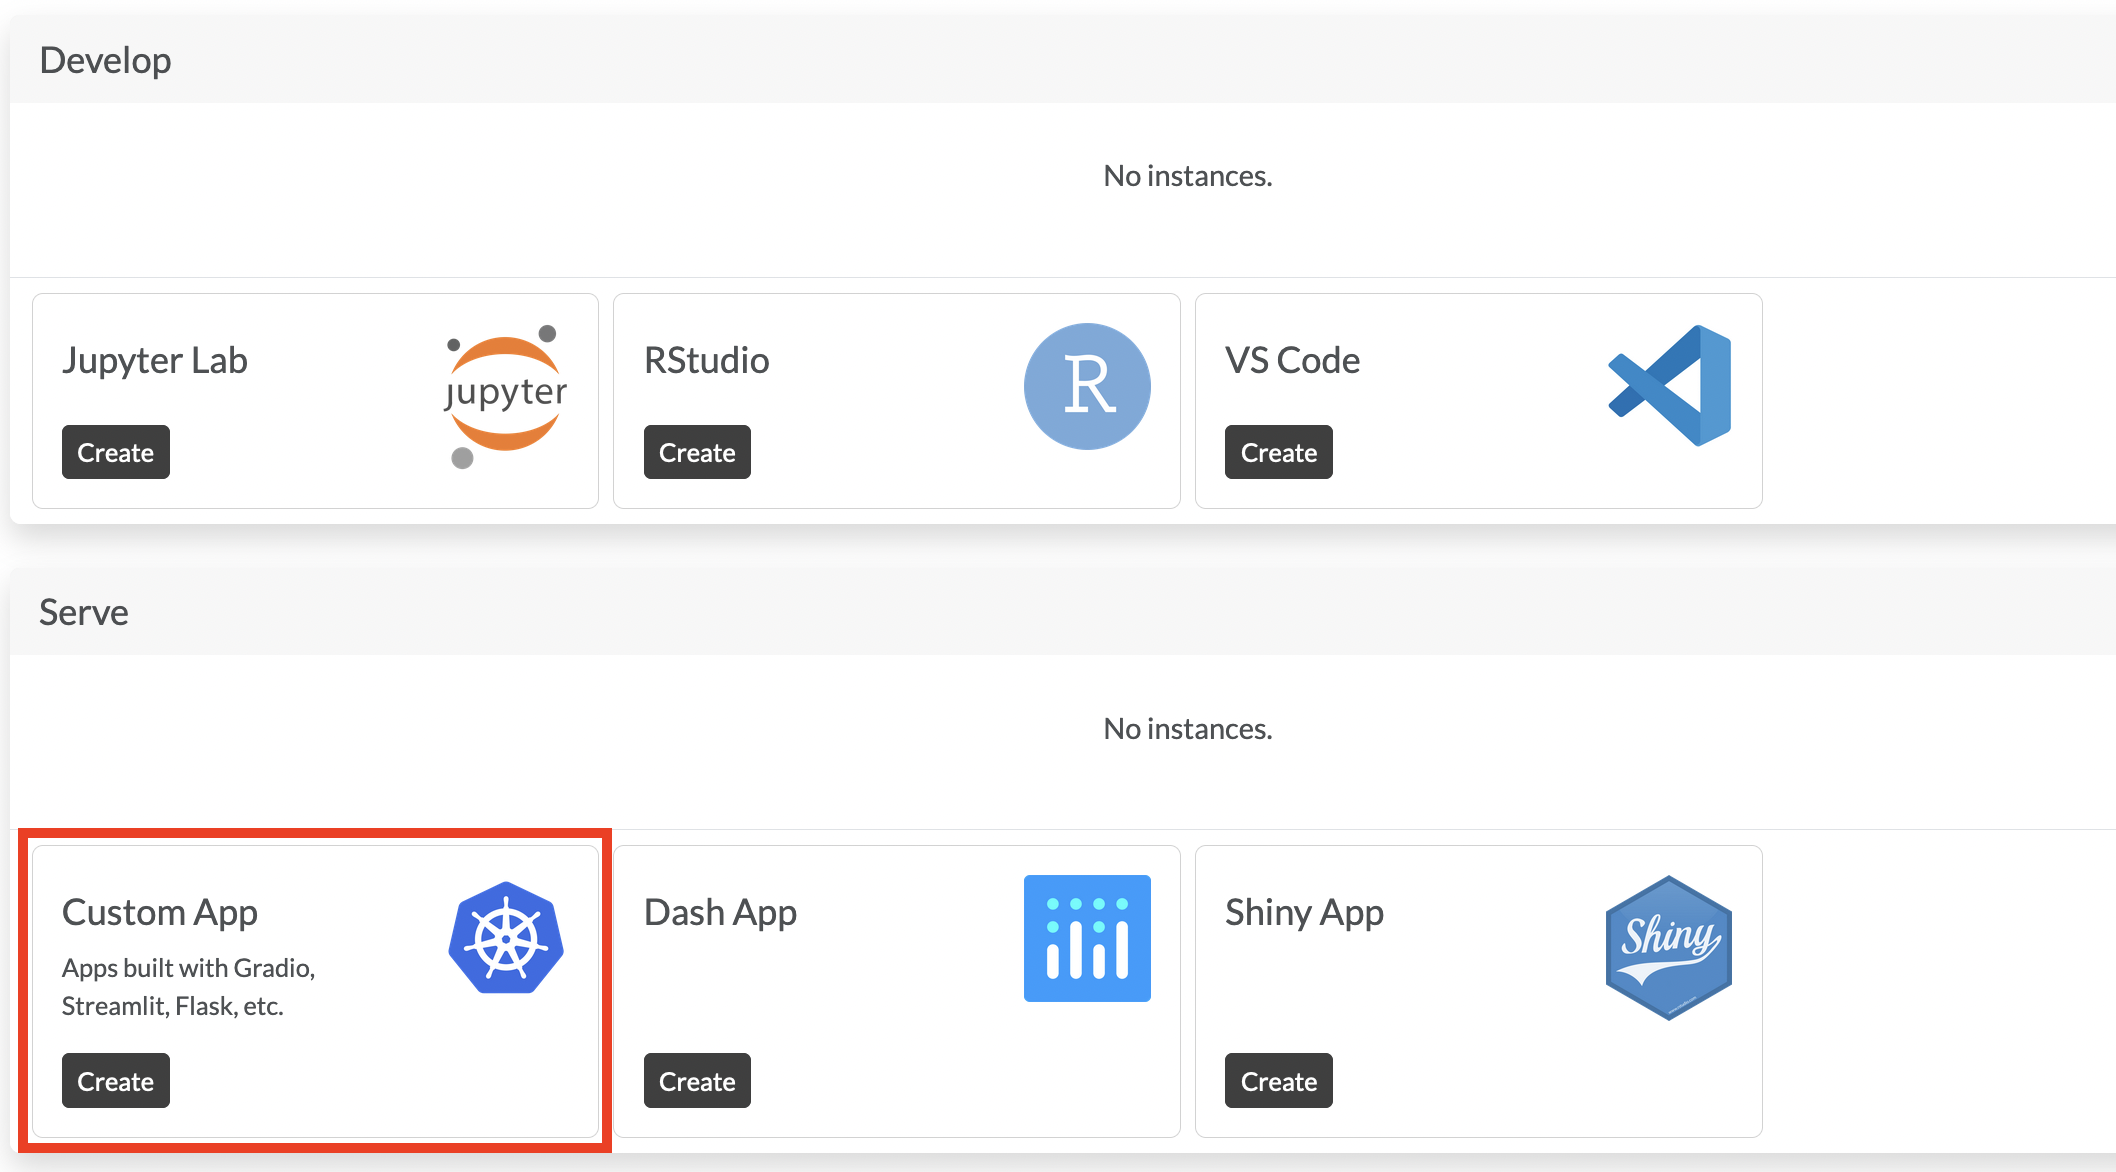
Configure it. Here you can give it a name, set permissions (visibility), give it a specific subdomain to use etc. This could look something like this:
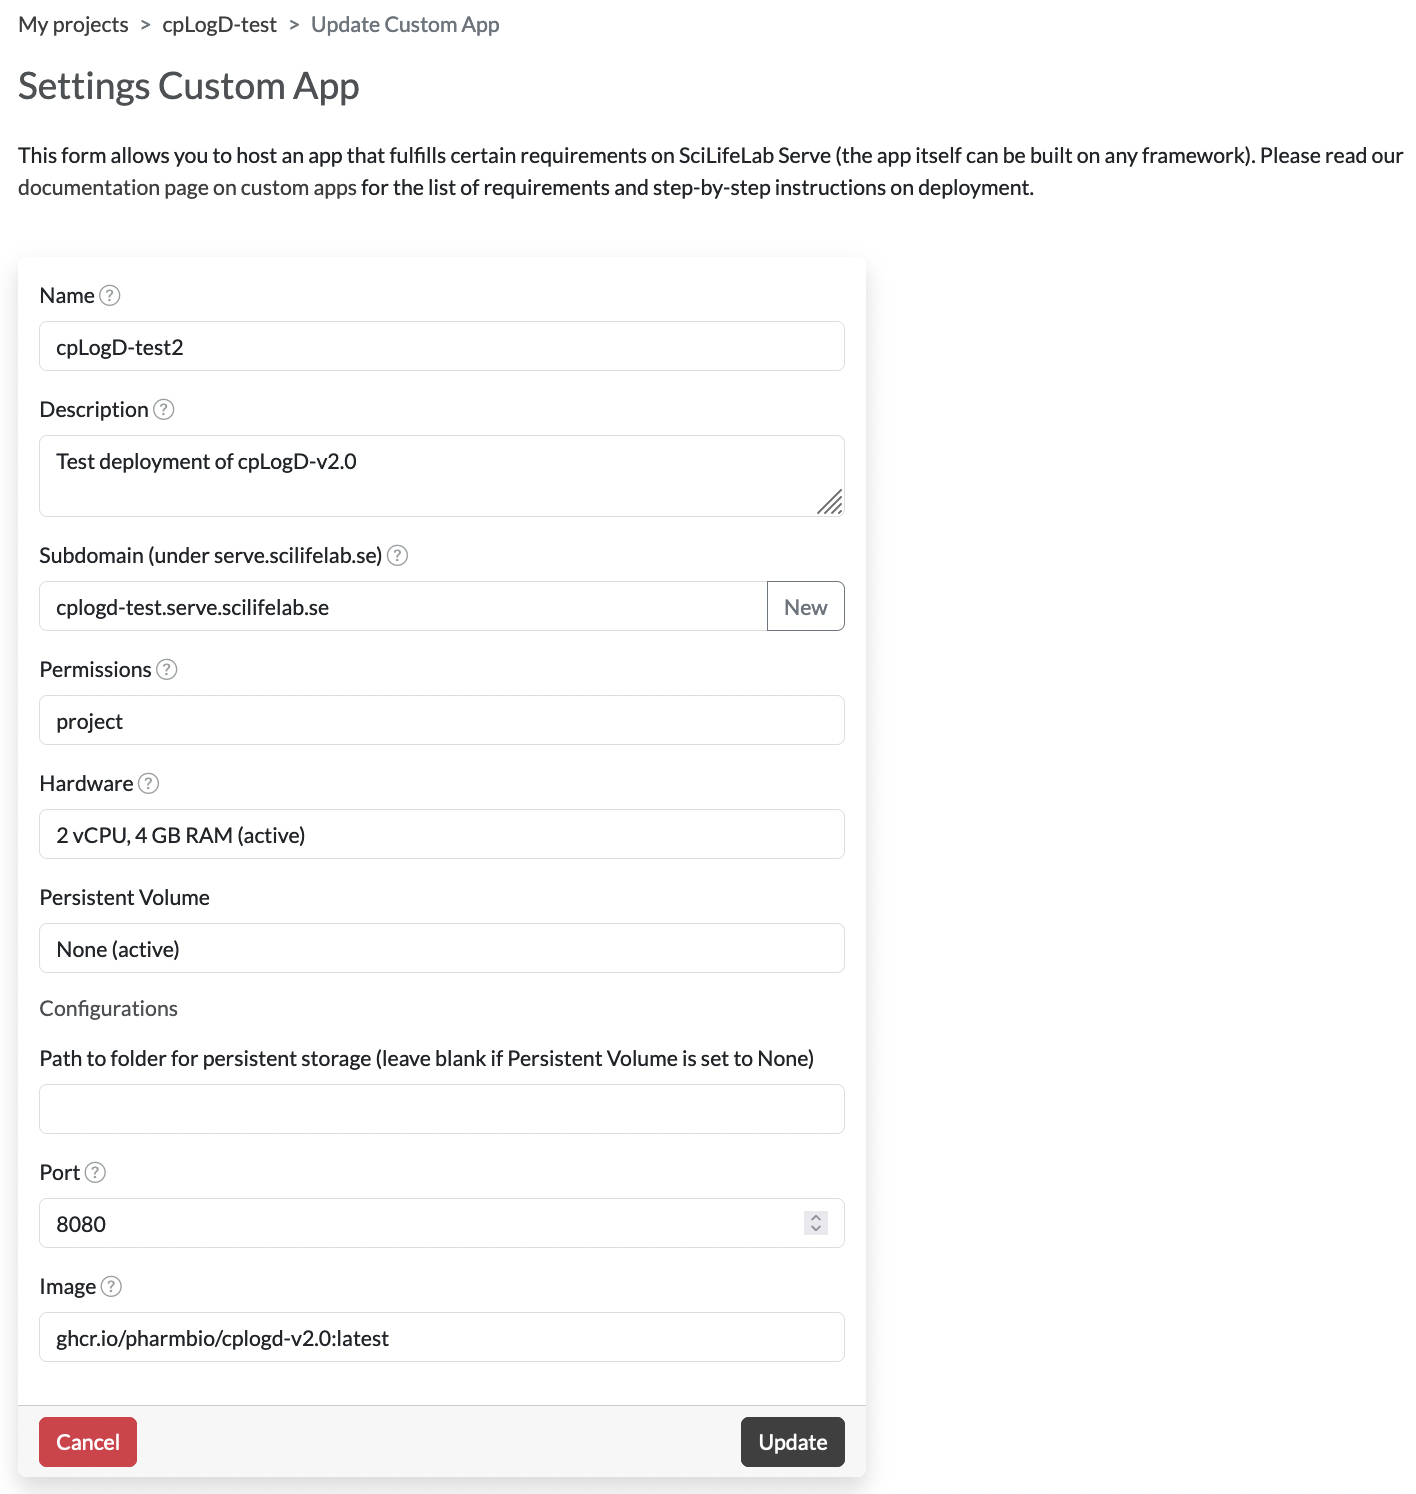 Note that you must set the
 Portto8080as that is the port exposed in the Docker container. The Serve infrastructure will forward the normal HTTP port (80) to the port exposed in the container. You do not need a Persistent Volume as everything is contained within the docker image. It will take a little while for the service to start up, once the status is “Running” you should be able to press the name and go to the URL of the service (<your subdomain>.serve.scilifelab.se). This URL will be a Jetty backup-page unless you specified a tag with a-fullsuffix when writing your Dockerfile in step 1 above. If you add/api/v2/modelInfoafter this URL (i.e.,<your subdomain>.serve.scilifelab.se/api/v2/modelInfo) you should get the same information as when you tested it on your local machine.
Now you should successfully have published your model!
Final remarks
How to update your model
Currently the Serve system will cache all Docker images, meaning that in case you want to update your service for any reason it is not sufficient to overwrite your image at GitHub container repository and use the same tag. Instead you have to update the tag, e.g. use tag v1 first and then replace it with v2 for your next version. Then you can simply go into the settings in Serve and update to your new tag.