Image rendering
CPSign has functionality for rendering images of molecules. This functionality is mainly intended to give a visual interpretation of the prediction of a given molecule, either in the form of which substructure of the molecule had the largest impact on the prediction or as a gradient - depicting the impact each atom had to the prediction. Note that the Signatures Molecular Descriptor [1-3] must be used for both these image types, but the full descriptor set can include additional descriptors as well. Further note that the model must include percentiles information, which is computed during training of the predictor model (controlled by adding the --percentiles flag in the CLI).
Image types
As stated above, there are two rendering options:
Color complete molecule gradient: This coloring is based on the full molecular gradient, depicting each and every atoms respective contribution in the prediction. This is done by computing the contribution for each individual signature and then tracking from which atoms they stem from, each atoms final contribution is computed by averaging the contribution all signatures that it is considered the center of. The rendered molecules will thus have a color on every atom, assuming that you have not done extensive feature selection so that some atoms do not have any signatures stemming from them.
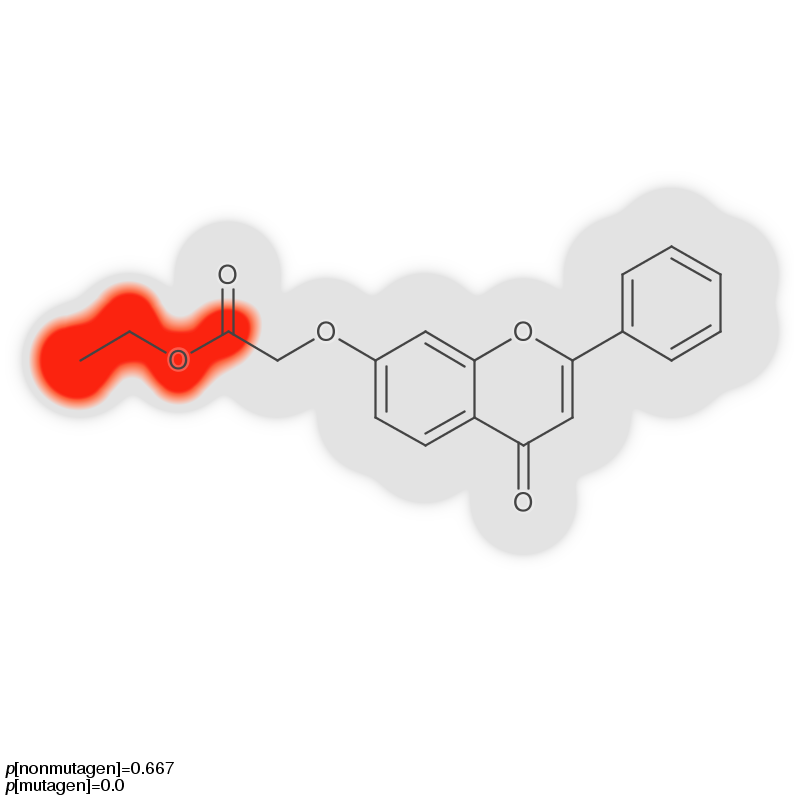
Color Significant Signature only: This coloring is based on the Significant Signature only, i.e. finding the descriptor that had the highest influence on the prediction score (considering absolute values, the contribution could be negative). Atoms that are part of the Significant Signature will be colored after a given highlight color. When using the CLI, the significant signature will be calculated using changes of the highest p-value for conformal classifiers, or change in the probability of the most probable class for Venn-ABERS classifiers.
Image rendering on Command Line
Both types of images can be generated at the same time, each controlled by their own set of parameters. For simplicity the parameter names start with either gi: for controlling gradient images or si: for significant signature images, but are otherwise almost identical. Activating the rendering of either type requires the user to give the -gi, --gradient-images or -si, --signature-images flags. Apart from this, the only parameter that differ between the two types of renderings is the parameter for controlling the coloring;
For gradients images you specify the color-scheme using the
-gi:cs, --gi:color-schemeparameter, which takes either one of the pre-sets (can be specified with a number 1-5, see Color schemes section for how they look) or either 2 or 3 colors separated by a colon character (:), e.g.green:blue:red. The colors can be given as common color names, RGB-values or hex-codes. Examples;forestgreen,rgb(15,16,100)and#730707. When giving 2 colors these specifies the colors of the endpoints (most negative contribution and most positive contribution, respectively), whereas giving 3 colors specify the most negative, no contribution and the highest possible contribution.For Significant Signature images you specify the color to highlight the atoms part of the significant signature with using the
-si:c, --si:colorparameter. The remaining atoms of the molecules will be surrounded by a gray-ish color for visually pleasing images.
Again note that the model must include the percentiles information, controlled by adding the --percentiles flag during the preceding train step.
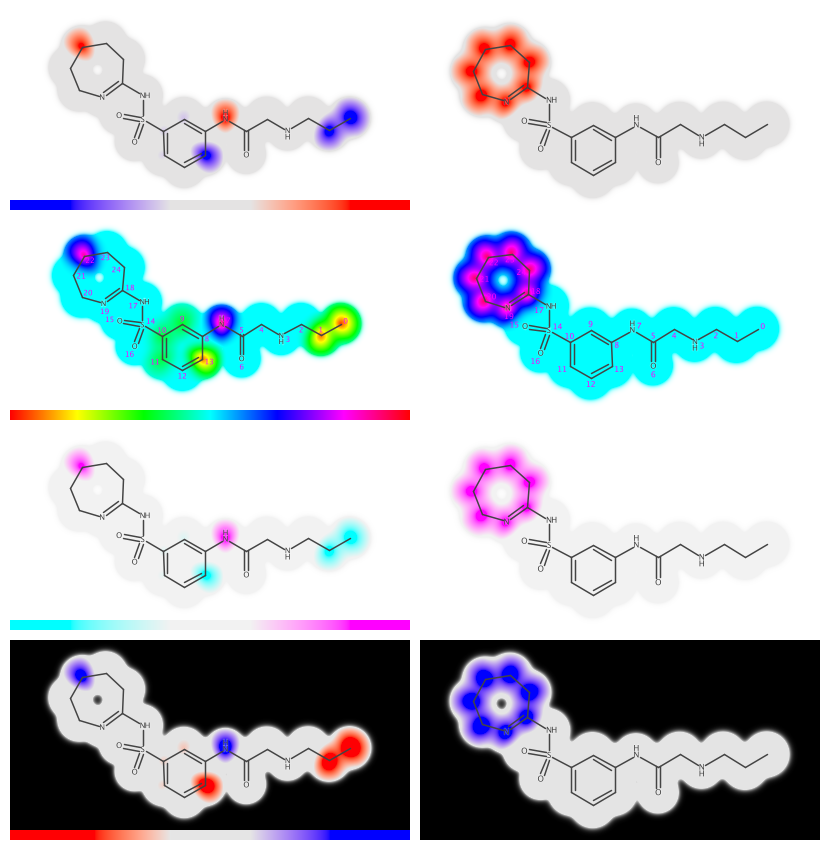
Example Images
Here are some code snippets, note that you need more arguments (e.g. the molecule and the model) in order to get the output. Here showing that for instance the color inputs is case-independent.
Significant Signature, using:
> ./cpsign-[version]-fatjar.jar predict \
   --signature-images \
   --si:color RED \
   ...
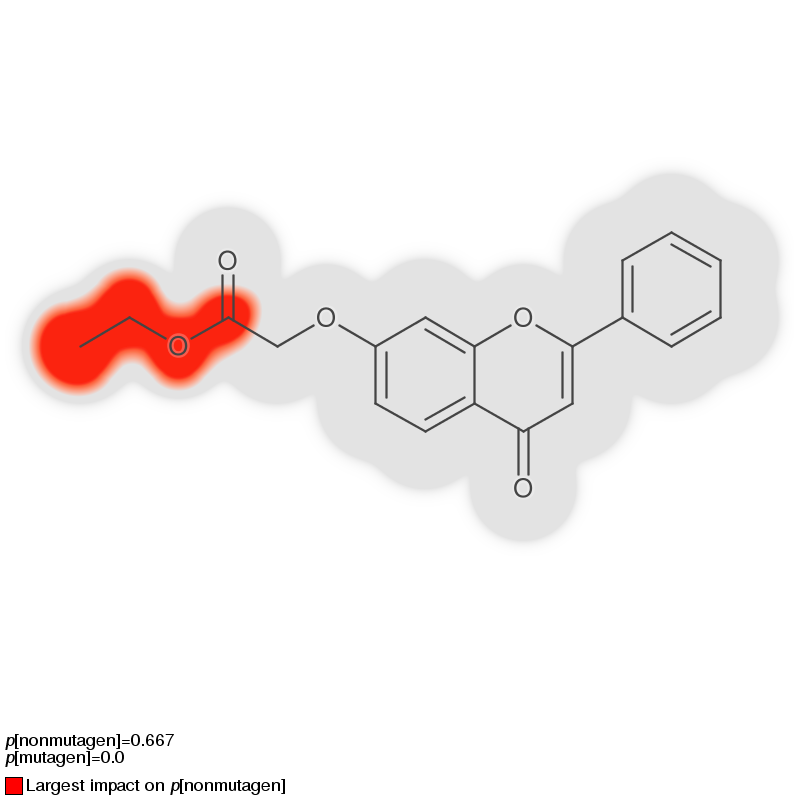
Significant Signature only with color legend, using:
> ./cpsign-[version]-fatjar.jar predict \
   --signature-images \
   --si:color red \
   --si:legend \
   ...
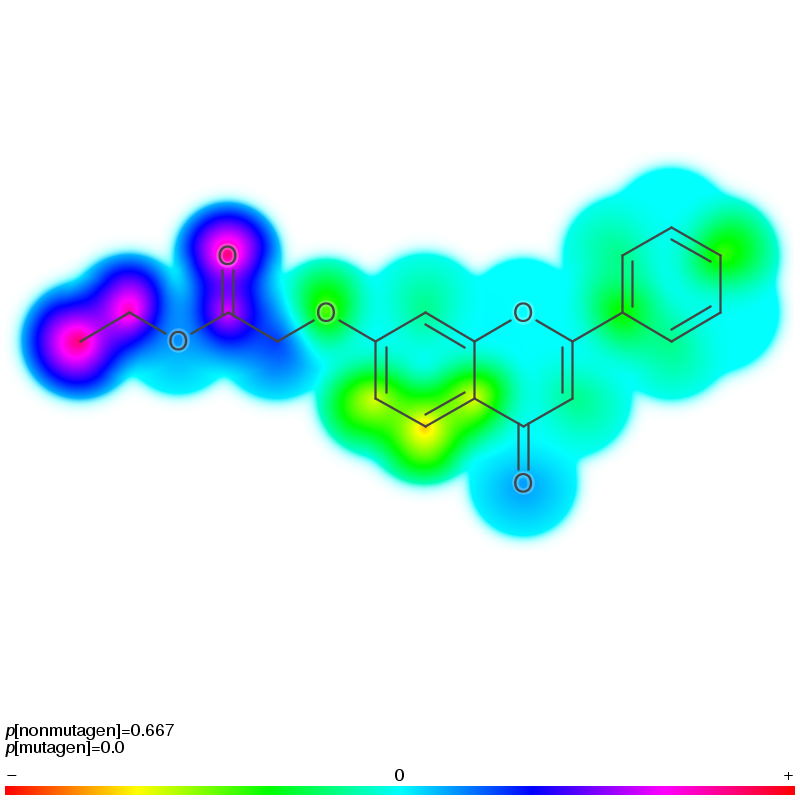
Molecule gradient with rainbow color scheme, using:
> ./cpsign-[version]-fatjar.jar predict \
   --gradient-images \
   -gi:cs rainbow \
   --gi:legend \
   ..
Molecule gradient with color legend and atom numbers using:
> ./cpsign-[version]-fatjar.jar predict \
   --gradient-images
   -gi:cs red:blue:red \
   --gi:legend \
   --gi:atom-numbers BLACK \
   ..
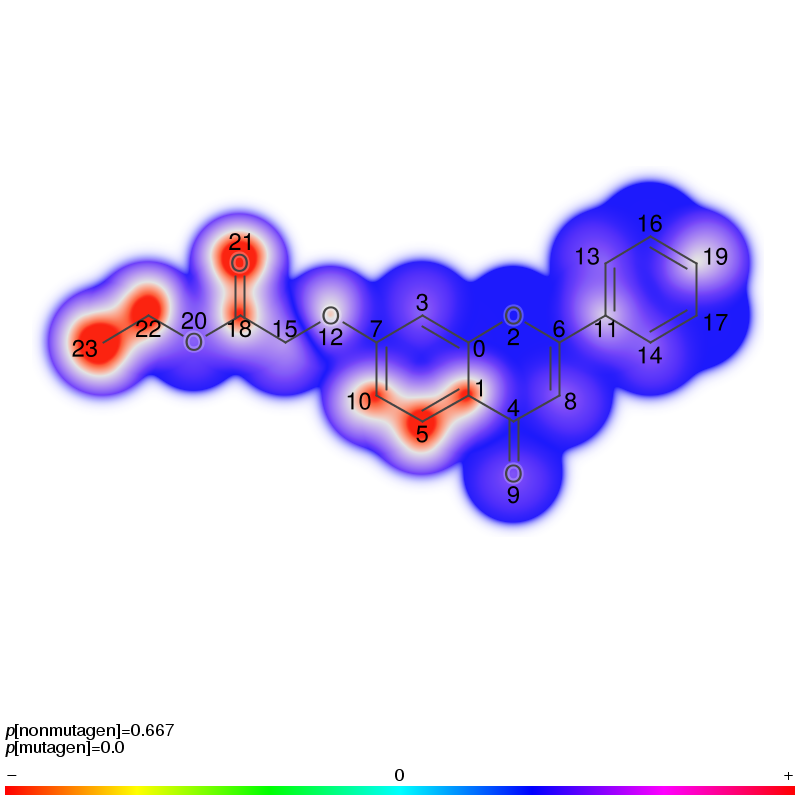
Image rendering in API
Image rendering in the API can be done in two ways;
MoleculeDepictor: Only renders java BufferedImage of the molecule, including highlighting. It cannot add any other elements to the image apart from the molecule itself.AtomContributionRendererandSignificantSignatureRendererclasses: More complex classes that allows the user to add additional fields (element) in the final depiction, e.g. setting a title and legend. These work by setting up a “template” using a builder class, containing all the desired fields in the final images, these templates can then be called with arendermethod with all information needed to make the rendering for a molecule. The output is a wrapped java BufferedImage with utility methods for saving the output as a Base64 String or saved directly to a PNG file.
Regardless if you choose the builder classes or the MoleculeDepictor, you will have to take care of how to color the atoms. When you calculate the gradient of a molecule with predictSignificantSignature() method you will get a both a set of atoms that are part of the Significant Signature and a map for the full molecule gradient (IAtom to a floating point value). If you wish to use the full molecule gradient, you will have to make sure that the floating point value is normalized (otherwise the depiction will likely not give you much information). If the model was trained through the CLI this is achieved using the flag --percentiles and the argument --percentiles-data, if using the Java API you have to call the computePercentiles(java.util.Iterator) method after training:
// Load data
acp.addRecords(iterator,
            "Ames test categorisation",
            new NamedLabels(Arrays.asList("nonmutagen", "mutagen")));

// Train
acp.train();

// Compute percentiles
acp.computePercentiles(iterator);
MoleculeDepictor
If you wish to have flexibility in the depiction, for instance creating a larger report with multiple molecule depictions, render your image on a specific background (e.g. with a water-mark) or include a color coding bar, you can use the MoleculeDepictor class. The MoleculeDepictor renders images and returns them as a BufferedImage, giving you all the flexibility that you could desire. The general usage:
// Get an instance of the MoleculeDepictor with the ColorGradient you wish to use

MoleculeDepictor mp = new MoleculeDepictor.Builder()
   .h(height) // image height in pixels
   .w(width) // image width in pixels
   .colorScheme(GradientFactory.getRainbowGradient())
   .showAtomNumbers(true)
   .bg(Color.WHITE) // Back ground color
   // .. more tweaks
   .build();

// Either generate a new BufferedImage and fill it
BufferedImage img = mp.depict(molecule, atomColors);
// Or draw into an existing BufferedImage
mp.depict(molecule, atomColors, img, g2, drawArea);

// Save the image as a file
ImageIO.write(img, "png", new File("/tmp/image.png");
There GradientFactory generates gradients these factory methods:
getDefaultBloomGradient
getBlueRedGradient
getRedBlueGradient
getRedBlueRedGradient
getCyanMagenta
getRainbowGradient
getCustomGradient(String) - accepts a JSON string with points to interpolate between
It’s also fully possible to implement the ColorGradient interface if you wish to make your own.
There is a working example of how to generate customized images our GitHub repository, in the class GeneratePredictionImages.java. That code currently depicts this image:
AtomContributionRenderer and SignificantSignatureRenderer classes
The two classes GradientFigureBuilder and SignificantSignatureFigureBuilder are new to v0.7.0 of CPSign
and replaces the old MolImageDepictor class. These now come with quite a few configurations and is much more
configurable. Once you call the build() method you get a MoleculeFigure that holds the rendered BufferedImage
and supports there output formats:
Java BufferedImage
Base64 String
PNG file
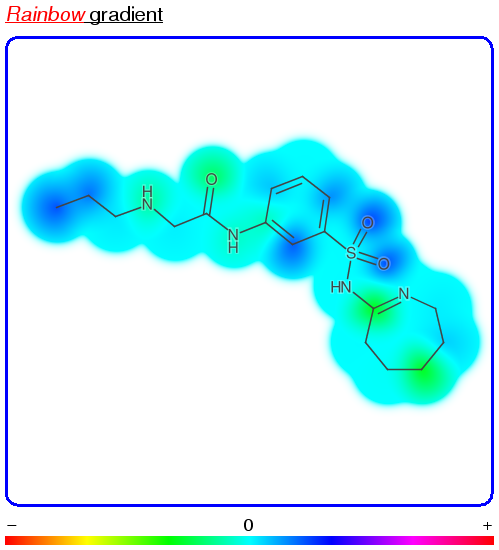
The usage is fairly straight forward (example taken from examples in GitHub):
// Instantiate builder instance
AtomContributionRenderer.Builder builder = new AtomContributionRenderer.Builder()
   .colorScheme(GradientFactory.getRainbowGradient()) // Decide which gradient or color scheme to use
   .height(550) // Figure height in pixels
   .width(499); // Figure width in pixels

// Configure a fixed title field
String titleText = "Rainbow gradient";
AttributedString title = new AttributedString(titleText);
// See available attributes at: https://docs.oracle.com/javase/8/docs/api/java/awt/font/TextAttribute.html
title.addAttribute(TextAttribute.UNDERLINE, TextAttribute.UNDERLINE_ON, 0, titleText.length()); // Add underline
title.addAttribute(TextAttribute.FOREGROUND, Color.RED, 0, 7); // Add red text for "Rainbow"
title.addAttribute(TextAttribute.POSTURE, TextAttribute.POSTURE_OBLIQUE, 0, 7);
// Create the fixed (immutable) text field as title
TextField titleField = new TextField.Immutable.Builder(title).alignment(Vertical.LEFT_ADJUSTED).build();
builder.addFieldOverMol(titleField); // title on top if depiction

// Add a boarder around the molecule
Boarder molBoarder = new Boarder.Builder().shape(BoarderShape.ROUNDED_RECTANGLE).stroke(new BasicStroke(3f)).color(Color.BLUE).build();
builder.molLayout(new CustomLayout.Builder().boarder(molBoarder).margin(new Margin(5)).build());

// Add a field below the molecule with the color scheme
builder.addFieldUnderMol(new ColorGradientField.Builder(builder.colorScheme()).build());
// Render the 'testMolecule' atom using the SignificantSignature prediction
MolRendering fig = builder.build().render(new RenderInfo.Builder(testMolecule, ss).build());
// Save it to a file
fig.saveToFile(new File(imageDir, "FullGradientRainbow.png"));
The resulting image:
Usage of the SignificantSignatureFigureBuilder is equivalent except the color configuration which is performed by setting the highlight(Color) and bloomBackground(Color), rather than the colorScheme(ColoGradient) used in the above example.
Figure dimensions
Image dimension can both be set on the MoleculeDepictor and on the renderer-classes, where the latter has precedence over the former. When using the rendered-classes these will overwrite the dimensions of the wrapped MoleculeDepictor once the dimensions have been calculated (i.e. to account for additional figure fields/elements).
Color schemes
Predefined color schemes supported by CPSign (both API and CLI).
BLUE:RED (Default)

RED:BLUE

RED:BLUE:RED

CYAN:MAGENTA

‘Rainbow’ gradient
